

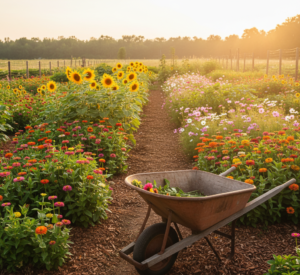
You are not the only one who has seen pictures of someone holding huge bouquets of homegrown flowers and thought, “I want to do that.” There is a clear distinction between a classic landscape garden and a cutting garden, though.
A cutting garden is a place where things are made. It was made to be productive, efficient, and long-stemmed, not to appear great all the time.
When you treat your backyard plot like a tiny flower farm, you adjust how you prepare the soil, how far apart you plant your plants, and how you pick them.
The secret to having flowers all the time isn’t a magic fertiliser. I’ve grown a lot of rows of zinnias, sunflowers, and fillers. It has to do with vigorous soil preparation, harsh pinching, and planting at different times.
The Foundation: Site Selection and Soil Mechanics
For a cutting patch to be successful, it needs at least six hours of direct sunlight every day. You need to nourish the soil so it can feed your plants once you’ve found that sunny area.
Flowers need a lot of food, and cutting them all the time drains the soil’s energy quickly.
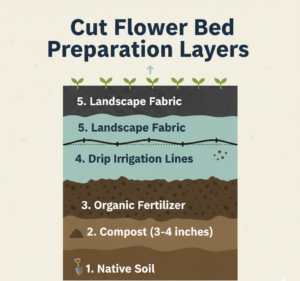
Before you plant, go to your local extension office and get a soil test to check for organic matter, pH, and missing trace minerals. Guessing a lot can cause stems to stop growing and blossoms to be weak.
Heavy amendments are needed for high productivity. Putting a thick layer of high-quality compost on top of your beds is a proven method. Bulk compost made from recovered plant detritus normally costs between $15 and $17 per yard.
Sprinkle a lot of a balanced organic fertiliser, like a 7-2-4 mix with bone meal, feather meal, and kelp, on top of the compost. Use roughly 1.5 pounds of fertiliser for every 10 linear feet of bed. To make a rich, loose growing environment, mix these things into the top layer of soil with a tiller or broadfork.
Designing for Yield
When laying out your garden, resist the urge to plant in whimsical clusters. Plant in straight rows. This makes weeding, netting, and harvesting infinitely easier.
Orientation and Spacing
Always order your plant heights from tallest to shortest along a North-to-South axis. Place towering crops like sunflowers and amaranth on the North or Northwest side of your plot so they don’t cast shadows over your shorter crops like calendula or ageratum.
Leave a 12- to 24-inch access path between your 36-inch wide planting beds. You need enough room to walk through with a harvesting bucket without breaking delicate stems.
The 80/20 Rule of Floral Design
To ensure you can actually make balanced bouquets, you need the right ratio of plant types. Aim for focal flowers and fillers to make up 80% of your garden space, while dedicating the remaining 20% to spikes and airy accent flowers.
Practical Layout Table for Beginners
| Plant Type | Role in Bouquet | Spacing | Pinch? | Harvest Stage |
|---|---|---|---|---|
| Sunflower (ProCut) | Focal | 4–6 inches | No | Petals just unfurling |
| Zinnia (Benary’s Giant) | Focal / Filler | 9–12 inches | Yes | Fully open, stiff stem |
| Celosia (Plume/Brain) | Textural Filler | 6–9 inches | Yes | Fully open |
| Basil (Lemon/Cinnamon) | Foliage / Scent | 6–9 inches | Yes | Stems are stiff, flowered |
Tip: Tighter spacing forces plants to compete for sunlight, which naturally encourages longer, straighter stems perfect for vase arrangements.
Advanced Techniques: Pinching for Better Blooms
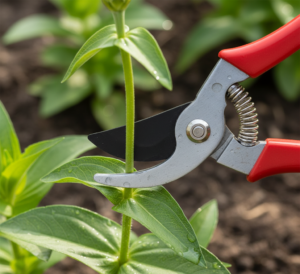
One of the most counterintuitive things you will do as a flower grower is cut the heads off your perfectly healthy young plants. This process, called “pinching,” is a non-negotiable step for branching annuals.
Removing the central growing tip forces the plant to temporarily redirect its energy from flower production down into vegetative and root growth.
The result is a much sturdier plant that produces multiple long, usable stems rather than one short, thick central stem.
Step-by-Step Pinching Guide
- Wait for the right height: Let your seedlings grow to about 8 to 12 inches tall, ensuring they have several sets of true leaves.
- Sanitize: Carry a small jar with a 50-50 mix of hydrogen peroxide and water. Dip your floral snips in the solution between plants to prevent the spread of disease.
- Make the cut: Locate the central stem and snip it cleanly about 3 to 4 inches from the top, directly above a set of leaves.
- Water and wait: Give the plants a deep watering. Within a few days, you will see side shoots pushing out from the leaf axils.
What NOT to pinch: Never pinch single-stem varieties like ProCut sunflowers, Bombay celosia, or delphinium. Since they are “one-and-done” flowers, pinching them will destroy your only bloom.
Succession Planting: Avoiding the “Feast or Famine” Trap
If you plant all your seeds on May 15, you will have an overwhelming explosion of flowers in July, and a completely barren garden by late August. To achieve beautiful blooms all season long, you must master succession planting.
Succession planting means sowing seeds in staggered intervals over the course of the growing season.
Real-World Case Example: The Block Method
To keep things manageable, divide your garden into three distinct “blocks.” Instead of planting everything at once, you replicate your planting plan three times. Here is what a typical schedule looks like, assuming a mid-May last frost date:
- Block 1: Planted on May 15 (Begins blooming mid-July).
- Block 2: Planted on June 1 (Begins blooming early August).
- Block 3: Planted on June 15 (Begins blooming late August).
By the time Block 1 starts looking ragged and tired in mid-August, Block 2 is at its absolute peak, and Block 3 is just beginning to open.
Note on Sunflowers: Because single-stem sunflowers mature in just 55 to 60 days and only produce one flower, they require a much tighter succession schedule. You should direct sow a new batch of sunflowers every 10 to 14 days from your last frost date all the way through late summer.
Irrigation: The Case for Drip Systems
Overhead sprinklers are the enemy of the cut flower garden. They waste water, promote fungal diseases like powdery mildew, and can physically batter delicate blooms.
Instead, install a micro-irrigation drip system. Drip irrigation is highly efficient, exceeding 90% efficiency compared to the 50-70% of sprinklers. It applies water slowly directly to the root zone, maintaining an optimal air-water balance in the soil without washing away nutrients.
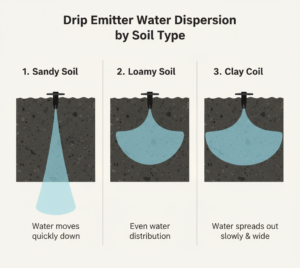
When laying out your drip lines (often 1/2-inch or 3/4-inch polyethylene mainline), snake them through the beds and anchor them with wire pins every three feet. The spacing of the water-emitting holes depends on your soil texture:
- Sandy Soil: Emitters spaced 12 inches apart (water drains straight down quickly). We run four lines of drip tape per 4-foot bed in sandy conditions.
- Loam Soil: Emitters spaced 18 inches apart.
- Clay Soil: Emitters spaced 24 inches apart (water moves laterally more easily).
Always install a 150- to 200-mesh filter to prevent clogged emitters, and attach a pressure regulator to drop your household water pressure down to the 20 to 30 psi required for drip systems.
Post-Harvest Handling: Making Your Flowers Last
Growing the flowers is only half the battle; how you handle them after they leave the plant dictates their vase life. Proper post-harvest care can easily extend a bouquet’s life to a full week or more.
The Rules of the Harvest
Timing is everything: Cut flowers in the early morning or late evening when their cells are fully turgid (packed with water). Harvesting in the heat of midday leads to immediate wilting.
Cut at the correct stage:
- Spike flowers (like Snapdragons or Celosia): Harvest when 25% of the bottom florets are open.
- Daisy-type flowers (like Zinnias or Rudbeckia): Harvest when petals are lifting off the center disk. For zinnias, perform the “wiggle test”—shake the stem gently. If the flower head wiggles on the neck, it’s not ready. If it remains stiff, cut it.
- Umbel flowers (like Ammi or Dill): Harvest when 50% of the tiny flowers are open, and the stem feels rigid.
Strip the stems: Immediately strip any foliage that will sit below the water line in your bucket. Rotting leaves breed bacteria, which clog the flower’s vascular system and cause premature wilting.
Hydrate immediately: Plunge cut stems into clean buckets filled with cool water. Add a commercial floral preservative or a DIY mix (1 tsp sugar, 1 tsp bleach, 2 tsp lemon juice per quart of water) to feed the blooms and keep the water acidic and bacteria-free.
For an in-depth look at sanitization protocols, refer to guidelines published by the University of California Cooperative Extension.
Common Mistakes Checklist
Before you order your seeds, run through this quick troubleshooting checklist based on the most frequent errors beginners make:
- Ignoring soil health: Skipping the compost and fertilizer step will leave you with weak, stunted stems.
- Planting too sparsely: Giving plants too much room makes them grow short and bushy. Tight spacing forces them to reach for the sun, giving you long stems.
- Being afraid to pinch: If you don’t pinch branching varieties, you will severely limit your yield.
- Planting everything on Day 1: If you don’t succession plant, your garden will be empty by late August.
- Using dirty buckets: Bacteria is the number one killer of cut flowers. Wash your harvest buckets with hot, soapy water and bleach.
Frequently Asked Questions
Can we establish a cutting garden on raised beds?
Yes, raised beds are great for drainage and keeping weeds under control. But they dry out faster than beds that are in the ground, thus it’s really important to use drip irrigation. They also cost more to fill with good soil up front.
How can I keep bugs and deer away?
Deer see a cutting garden as an all-you-can-eat buffet, and they really prefer sunflowers. Use a deer repellent every day from the time the seedlings come up until the harvest. Hand-picking Japanese beetles off of zinnias and putting them in a pail of soapy water in the morning is safer for pollinators than using broad-spectrum sprays.
Do perennial flowers take up too much space?
Annuals give the most colour all summer long, but perennials are the ones that keep going year after year. Peonies, for instance, can survive for more than 50 years and make 20 to 30 huge cutting stems each season. Keep in mind that it normally takes 2 to 3 years for perennials to get established before you can harvest a lot.
Last Thoughts
Starting a cut flower garden is an active, hands-on endeavour. You need to think of your backyard more as a farm than as a landscaping endeavour.
You go from hoping for a few gorgeous flowers to maintaining a steady, season-long yield by evaluating and feeding your soil, using drip watering, and planting at different times.
Try forgiving flowers like zinnias, cosmos, and sunflowers first. When you get the hang of planting, pinching, and cutting, your garden will give you more stems than you have vases to put them in.