
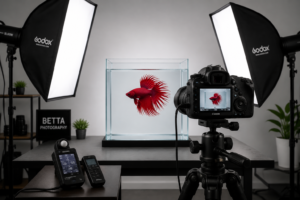
To photograph bettas for online sales successfully, use natural or soft artificial lighting, position your camera at the fish’s eye level, and ensure the aquarium is spotless with a neutral background. The key is capturing the fish’s vibrant colors and flowing fins in sharp detail while avoiding reflections and distracting elements that could deter potential buyers.
What Equipment Do You Need to Photograph Bettas for Online Sales?
A basic DSLR or mirrorless camera with a macro lens produces the best results for betta photography. However, high-end smartphones can work if you understand their limitations.
Essential Camera Equipment
Camera body: Any DSLR or mirrorless camera from the past 5 years will work well. Full-frame sensors aren’t necessary – crop sensors actually provide extra reach for close-up shots.
Lens selection: A 60mm or 100mm macro lens is ideal for betta photography. These lenses allow you to fill the frame with your fish while maintaining a comfortable working distance from the tank.
Tripod: Stability is crucial when shooting through glass. A sturdy tripod prevents camera shake and allows you to fine-tune composition without disturbing the fish.
Lighting Setup for Professional Results
Softbox lights: Two small LED softboxes positioned at 45-degree angles to the tank eliminate harsh shadows and reduce reflections. Choose lights with adjustable color temperature (3200K-5600K).
Reflectors: White foam boards or professional reflectors can bounce light back onto the fish, filling in shadows and creating even illumination.
Polarizing filter: This camera accessory cuts through reflections on the glass surface, though it reduces the amount of light reaching your sensor.
Common mistake: Avoid using the camera’s built-in flash, which creates harsh reflections and startles the fish.
How Do You Set Up the Perfect Tank Environment?
The tank setup is equally important as camera technique when you photograph bettas for online sales. A clean, distraction-free environment makes your fish the star of the image.
Tank Preparation Steps
- Deep clean the glass – Use aquarium-safe glass cleaner inside and out.
- Remove decorations – Take out plants, ornaments, and substrate temporarily.
- Install a neutral background – Tape colored paper or fabric to the back glass.
- Fill with conditioned water – Ensure water is crystal clear with no particles.
- Allow settling time – Wait 30 minutes for any bubbles to dissipate.
Background Color Selection
Blue backgrounds make red and orange bettas pop, while white or gray backgrounds work well for darker fish colors. Avoid busy patterns or multiple colors that compete with your betta’s natural beauty.
Choose white if you plan to sell multiple fish varieties, as it provides the most neutral backdrop for editing and maintains consistency across your listings.
What Camera Settings Work Best for Betta Photography?
Use aperture priority mode (A/Av) with f/5.6 to f/8 for optimal sharpness and depth of field. This range keeps the entire fish in focus while blurring any background elements.
Recommended Camera Settings
Aperture: f/5.6 to f/8 provides sufficient depth of field without diffraction softening.
Shutter speed: 1/125s minimum to freeze fish movement; 1/250s for very active bettas.
ISO: Keep below 800 to minimize noise; modern cameras handle ISO 400-800 well.
Focus mode: Single-point autofocus (AF-S/One Shot) works better than continuous AF.
Metering: Spot metering on the fish prevents the camera from being fooled by bright backgrounds.
White Balance Considerations
Set a custom white balance using a white card under your lighting setup. This ensures accurate color reproduction of your betta’s fins and body, which is crucial for online sales where buyers can’t see the fish in person.
Edge case: If mixing natural window light with artificial lighting, use daylight white balance (5600K) and adjust artificial lights to match.
How Do You Capture the Fish at Its Best Angle?
Side profile shots showing the full body and extended fins are most valuable for online betta sales. Buyers want to see the fish’s size, fin condition, and overall health clearly.
Essential Shots for Every Listing
Full side profile: Capture the fish swimming parallel to the glass with fins fully spread.
Face-on view: Shows the fish’s expression and front fin development.
Top-down angle: Reveals body shape and any spine curvature issues.
Close-up details: Focus on unique markings, fin patterns, or color variations.
Timing and Patience
Bettas are naturally curious and will often swim toward the camera lens. Use this behavior to your advantage by positioning the camera and waiting for the fish to approach.
Pro tip: Feed the fish lightly 30 minutes before shooting. A slightly hungry betta will be more active and responsive to movement outside the tank.
Avoid these mistakes: Don’t tap the glass, use sudden movements, or keep lights on for extended periods, as these stress the fish and affect photo quality.
What Post-Processing Techniques Enhance Betta Photos?
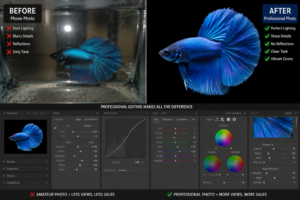
Minimal editing that enhances natural colors produces the most trustworthy online sales images. Over-processed photos can mislead buyers and result in returns or negative feedback.
Basic Editing Workflow
- Adjust exposure – Brighten or darken the overall image slightly.
- Increase contrast – Make the fish pop against the background.
- Enhance vibrance – Boost color intensity without over-saturation.
- Sharpen details – Apply subtle sharpening to fin edges and scales.
- Remove distractions – Clone out any remaining bubbles or spots.
Color Correction Guidelines
- Saturation limits: Increase saturation by no more than 20% to maintain realistic colors.
- Contrast balance: Enhance contrast while preserving detail in both highlights and shadows.
- White balance fine-tuning: Adjust temperature and tint to match how the fish appears in person.
Choose natural enhancement if you’re building a reputation as a trusted seller, as accurate photos lead to satisfied customers and repeat business.
How Do You Maintain Consistency Across Multiple Fish Photos?
Standardizing your photography process ensures all your betta listings have a professional, cohesive appearance. Consistency builds buyer confidence and makes your store look more established.
Creating a Standard Process
- Lighting setup: Use identical light positions and power settings for every shoot.
- Camera settings: Save your preferred settings as a custom mode for quick access.
- Background choice: Stick with 2-3 background colors maximum across all listings.
- Editing presets: Create and save adjustment presets for consistent post-processing.
Quality Control Checklist
- Fish is in sharp focus with no motion blur
- Colors appear natural and vibrant
- Background is clean and distraction-free
- Glass reflections are minimized
- The image is properly exposed with good contrast
- File size is optimized for web viewing
Common mistake: Rushing the process leads to inconsistent results. Plan 15-20 minutes per fish for setup, shooting, and basic editing.
Final Thoughts
Successfully photographing bettas for online sales combines technical camera skills with understanding fish behavior and buyer expectations. The investment in proper lighting, a clean setup, and a consistent editing workflow pays off through increased sales and customer satisfaction.
Start with the basics: clean tank, good lighting, and sharp focus. As you develop your technique, you’ll find that patience and attention to detail make the biggest difference in creating photos that sell fish quickly and build your reputation as a trusted seller.
FAQ
Can I use my smartphone to photograph bettas for online sales?
Yes, modern smartphones with macro capabilities can work, but you’ll need external lighting and may struggle with fine detail capture compared to dedicated cameras.
How many photos should I include in each betta listing?
Include 4-6 high-quality images showing different angles and fin positions. More photos build buyer confidence and reduce return requests.
What’s the best time of day to photograph bettas?
Mid-morning to early afternoon provides the most consistent natural light if you’re supplementing with window light, but artificial lighting allows shooting anytime.
How do I photograph shy bettas that hide from the camera?
Use a longer lens to maintain distance, dim the lights initially, and gradually increase brightness. Some fish need 10-15 minutes to acclimate to the setup.
Should I photograph bettas in their regular tanks or a photo tank?
A dedicated photo tank with neutral backgrounds and optimal lighting produces much better results than trying to work around decorations and established aquascaping.
How do I avoid reflections when shooting through glass?
Position lights at 45-degree angles, use a polarizing filter, and ensure the room behind the camera is darker than the tank lighting.
What file format should I use for betta photos?
Shoot in RAW format for maximum editing flexibility, then export high-quality JPEGs optimized for your selling platform’s requirements.
How do I make colors pop without making photos look fake?
Increase vibrance rather than saturation, and limit color adjustments to 15-20% maximum. The goal is to match what buyers would see in person.
What’s the minimum resolution needed for online betta sales?
Aim for at least 1200×800 pixels for the main image, with additional detail shots at a similar resolution for zoom functionality.
How often should I clean my photo tank setup?
Clean the glass and change water between every fish to maintain crystal-clear conditions. Even minor water spots show up clearly in macro photography.
Can I reuse backgrounds for different fish types?
Yes, but choose colors that complement most fish varieties. White, light gray, and soft blue work well across different betta colors and patterns.
What’s the biggest mistake beginners make when photographing bettas?
Using inadequate lighting and trying to shoot too quickly. Professional-looking betta photos require patience, proper lighting, and attention to detail.